Mikrotik Router OS CAPsMAN Wifi Controller Simple Configuration
Mikrotik
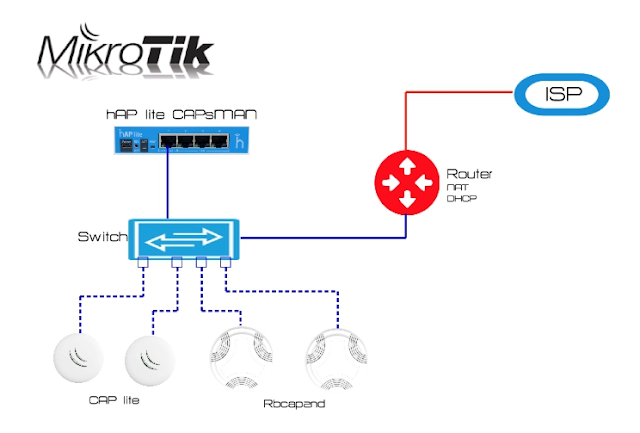
Router OS CAPsMAN Configuration
only
bridge mode with external DHCP server and NAT service
You
can deploy CAPsMAN wireless controller on any Mikrotik RouterOS
hardware (for instance Haplite series routers)
1st
step is to check our RouterOS image version, it should include
wiressless package (check System>Packages). OS version on CAPsman
controller should the same as in Access Point. You can upgrade the
version manual. Go to the System>Packages, then simply drag and
drop your previously downloaded imge. After I would recomend to
reboot it from CLI / system reboot and then just run / system
routerboard upgrade and again reboot it. Then we can check the
version / sys rou print.
2nd
step is to create bridge interface which should include our physycal
interface or several interfaces, so we create bridging between our
physycal interfaces or if it's only one interfaces then it will be
put into bridge mode. Let's check our interfaces:
/interface
print
/interface
bridge (this mode is for creating a bridges)
/add
name=bridge-wifi (this command assigns a name for the bridge)
/interface
bridge port ( this command assigns interfaces to our bridge)
/
add bridge=bridge-wifi interface=ether1
/
add bridge=bridge-wifi interface=ether2
/print
Of
course you can do it via Winbox.
Now
we are ready to configure CAPsMAN controller itself:
1.
Channels Profile Config
CAPSMAN
tab > Channels
click
+
and
choose
-
[ ] Name:Channel1
-
[ ] Frequency:2412
-
[ ] Width:20
-
[ ] Band:2Ghz b/g/n
-
[ ] Extension channel:disabled
Press
COPY and add parameters for the rest two channels
-
[ ] Name:Channel6
-
[ ] Frequency:2437
-
[ ] Width:20
-
[ ] Band:2Ghz b/g/n
-
[ ] Extension channel:disabled
-
[ ] Name:Channel11
-
[ ] Frequency:2462
-
[ ] Width:20
-
[ ] Band:2Ghz b/g/n
-
[ ] Extension channel:disabled
2.
Datapaths Configuration
CAPSMAN
tab > Datapaths
click
+
and
choose
-
[ ] Name: datapath1
-
[ ] Bridge: choose bridge interface previously created
-
[ ] Client To Client Forwarding: enable tick
If
you have several datapaths (depends on your configuration) you can
add it as many as required.
3.
Security Profile Configuration
CAPSMAN
tab > Security Cfg
click
+
and
choose
-
[ ] Name: security1
-
[ ] Authentication Type: WPA PSK WPA2 PSK
-
[ ] Encryption: aes ccm
-
[ ] Paraphrase: password
If
you have several security profiles (depends on your configuration)
you can add it as many as required.
4.
Wireless Settings Configuration
CAPSMAN
tab > Configuration
click
+
and
choose
-
[ ] Wireless tab
Name:
cfg1
Mode:
ap
SSID:
Dalga
Country:
USA
-
[ ] Channel tab:
Leave
it as it is
-
[ ] Datapath tab:
Datapath:
datapath1
-
[ ] Security tab:
Security:
security1
You
can add additional SSIDs if required
5.
Provisioning Configuration
CAPSMAN
tab > Provisioning
click
+
and
choose
-
[ ] Radio MAC: 00:00:00:00:00:00
-
[ ] Action: create dynamic enabled
-
[ ] Master Configuration: cfg1
-
[ ] Slave Configuration: cfg1
-
[ ] Name Format: cap
Now
we need enable CAPsMAN service
CAPsMAN
tab > Manager
-
Check Enabled
Access
Points Configuration
Its
time to configure Access Points. Again you can use Winbox to access
it:
Wireless
tab > CAP
-Check
Enabed
-
[ ] Interfaces: wlan1
-
[ ] Discovery Interfaces: ether1
That's
all. Configuration is completed.
Roaming
Configuration
Confguration
is carried out on CAPsMAN controller only. Just add following
commands:
/
caps-man access-list
/
add action=accept interface=all signal-range=-80..120
/
add action=reject interface=all signal-range=-120..-81
This
config script sets the level to kick a client at -80dBm. After that
client should switch over to nearist access point...
Check
out the Mikrotik Router OS CAPsMAN Wifi Controller Simple
Configuration Video


Comments